📝Appwrite
Appwrite is an open-source backend server that simplifies web and mobile application development with streamlined APIs for authentication, database, file storage, and more, enabling developers to focus on creating exceptional user experiences effortlessly.

Appwrite (code) helps you build secure and scalable apps, faster. Leverage Appwrite's powerful APIs to stop fighting technologies and start delivering value.
 appwrite
Appwrite (Code) is an open-source platform designed to simplify and accelerate backend development for web and mobile applications.
With a comprehensive set of APIs, Appwrite addresses common challenges in building robust applications, offering features such as authentication, database management, file storage, serverless functions, and real-time collaboration.
Whether you're a solo developer or part of a team, Appwrite empowers you to focus on creating exceptional user experiences without the complexities of managing intricate backend infrastructure.
Appwrite helps you ship faster, as a developer.
🤖 As described by AI
Appwrite is a cutting-edge open-source backend server, revolutionizing web and mobile application development. With its comprehensive suite of APIs, Appwrite simplifies complex tasks such as authentication, database management, and file storage, empowering developers to create robust and scalable applications with ease.
✅Features
Appwrite has a lot of features, all geared towards Developers that want to build apps fast.
- User management - Authentication, authorization, social login
- Databases - Document databases with REST APIs
- File storage - Upload and manage files
- Functions - Executing serverless code
- SDKs - For web, mobile, and Flutter apps
- Realtime APIs - WebSockets for realtime sync
- API docs - Auto-generated documentation
- Access control - Granular user permissions
- Usage stats - Metrics for analytics
- CLI tool - For server management
- Self-hosted - Can deploy yourself
- Open source - 100% free and open source
With Appwrite, building an application is much faster.
👟 Getting started with Appwrite
Here are the steps to self-host Appwrite along with commands:
1. Install Docker on your server. Appwrite uses Docker containers so Docker is a prerequisite.
sudo apt-get update
sudo apt-get install docker-ce docker-ce-cli containerd.io
2. Create a new directory for Appwrite data and configs. This will store your database and files.
mkdir /path/to/appwrite-data
3. Create an environment file with your configuration values like database credentials, keys, etc.
echo "APPWRITE_DB_HOST=localhost
APPWRITE_DB_PORT=27017
APPWRITE_DB_USER=root
APPWRITE_DB_PASS=password
" > /path/to/appwrite-data/.env
4. Pull the Appwrite Docker image from Docker Hub.
docker pull appwrite/appwrite
5. Run the Appwrite container using the docker run command, passing your config and data volumes.
docker run -v /path/to/appwrite-data:/usr/src/app/data -p 80:80 -p 443:443 appwrite/appwrite
6. Expose Appwrite ports 80 and 443 on the host for web access. Ensure that ports 80 and 443 are accessible on your server for web access.
7. For SSL, set up Let's Encrypt certificates for your domain. For SSL, use Certbot to set up Let's Encrypt certificates. Follow the instructions here.
8. For SMTP, Configure an email provider for SMTP. Update the .env file with SMTP details.
9. Create your first admin account using the Account API.
curl -XPOST 'http://localhost:80/v1/account' \
    -H 'Content-Type: application/json' \
    -d '{"email":"admin@example.com", "password":"your_password", "name":"Admin"}'
10. Start developing your application by integrating the Appwrite SDKs and APIs.
11. For production deployment, configure docker-compose, NGINX proxy, and HTTPS.
12. Monitor your Appwrite server logs, metrics, and health.
docker logs <container_id>
That covers the key steps to get Appwrite self-hosted on your infrastructure! The documentation has more in-depth guides. provide with command line commands.
See more details on the Getting Started page.
Using AppWrite with a NodeJS App
1. Create a Node.js CLI application.
mkdir my-app
cd my-app
npm init
2. Install the Node.js Appwrite SDK.
npm install node-appwrite3. Find your project ID on the Settings page.
Also, click on the View API Keys button to find the API key that was created earlier.
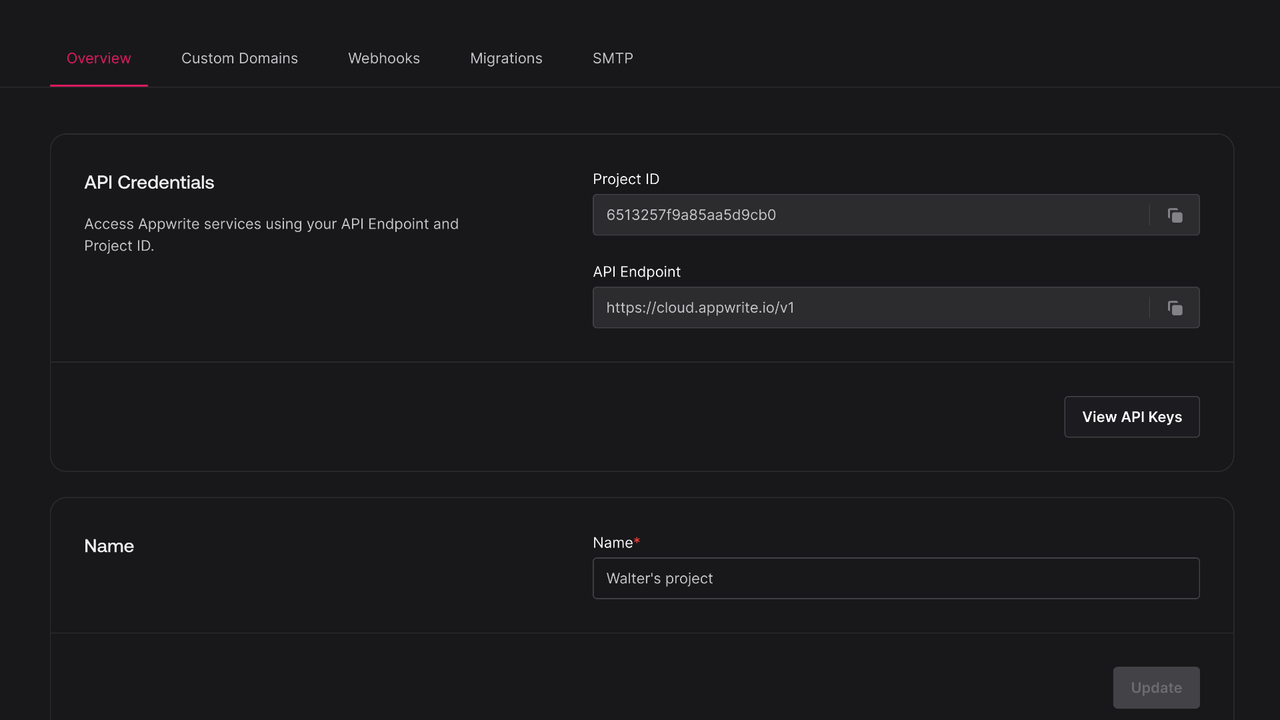
Create a new file app.js and initialize the Appwrite Client. Replace <YOUR_PROJECT_ID> with your project ID and <YOUR_API_KEY> with your API key.
const sdk = require("node-appwrite");

const client = new sdk.Client();

client
    .setEndpoint("https://cloud.appwrite.io/v1")
    .setProject("<YOUR_PROJECT_ID>")
    .setKey("<YOUR_API_KEY>");
4. Once the Appwrite Client is initialized, create a function to configure a to-do collection.
const databases = new sdk.Databases(client);

var todoDatabase;
var todoCollection;

async function prepareDatabase() {
    todoDatabase = await databases.create(
        sdk.ID.unique(),
        'TodosDB'
    );

    todoCollection = await databases.createCollection(
        todoDatabase.$id,
        sdk.ID.unique(),
        'Todos'
    );

    await databases.createStringAttribute(
        todoDatabase.$id,
        todoCollection.$id,
        'title',
        255,
        true
    );

    await databases.createStringAttribute(
        todoDatabase.$id,
        todoCollection.$id,
        'description',
        255, false,
        'This is a test description'
    );

    await databases.createBooleanAttribute(
        todoDatabase.$id,
        todoCollection.$id,
        'isComplete',
        true
    );
}
5. Create a function to add some mock data to your new collection.
async function seedDatabase() {
    var testTodo1 = {
        title: 'Buy apples',
        description: 'At least 2KGs',
        isComplete: true
    };

    var testTodo2 = {
        title: 'Wash the apples',
        isComplete: true
    };

    var testTodo3 = {
        title: 'Cut the apples',
        description: 'Don\'t forget to pack them in a box',
        isComplete: false
    };

    await databases.createDocument(
        todoDatabase.$id,
        todoCollection.$id,
        sdk.ID.unique(),
        testTodo1
    );

    await databases.createDocument(
        todoDatabase.$id,
        todoCollection.$id,
        sdk.ID.unique(),
        testTodo2
    );

    await databases.createDocument(
        todoDatabase.$id,
        todoCollection.$id,
        sdk.ID.unique(),
        testTodo3
    );
}
6. Create a function to retrieve the mock TODO data
You'll also want to create a function to execute the requests in order.
Run the functions by calling runAllTasks();.
async function getTodos() {
    var todos = await databases.listDocuments(
        todoDatabase.$id,
        todoCollection.$id
    );

    todos.documents.forEach(todo => {
        console.log(`Title: ${todo.title}\nDescription: ${todo.description}\nIs Todo Complete: ${todo.isComplete}\n\n`);
    });
}

async function runAllTasks() {
    await prepareDatabase();
    await seedDatabase();
    await getTodos();
}
runAllTasks();
7. Run your project
You can run your project using node:
node app.jsOnce your app is up and running, you can visit the endpoints and view the response in your console.
See more details on Appwrite's Getting Started page.